How to organize your TinyMDM console with a structure?
Prerequisite: For creating a structure to be of real benefit, you must have added at least one manager. (A manager corresponds to an additional access right in addition to the main administrator). Otherwise, creating a structure is not necessary.
The Structure tab enables you to go further in the managers configuration. It could be useful if:
- your TinyMDM account regroups multiple companies
- if you have many devices to manage and you don’t want every manager to have access to all the users / devices.
By creating a structure with multiple levels of hierarchy, you can link managers to a certain level of this structure. Then, they will only have access to a filtered view of the console, depending of their level in the structure.
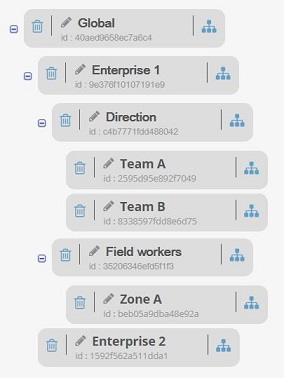
1. Create a structure
- To add levels (entities) in the structure, click on
 . You can then rename the entity.
 - To delete an entity, you only need to click on
 . Be careful: deleting an entity means that you also delete all the sub-entities.
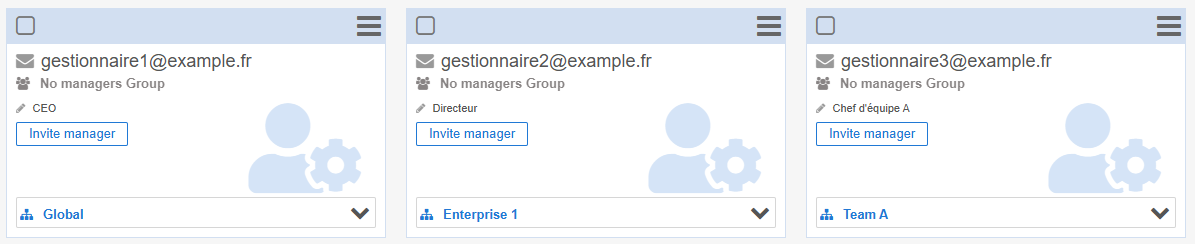
2. Assign managers to an entity of the structure
- Go in the Managers tab
- Click on
 in front of No entity
 - Select the entity that is to be linked to this manager.
A manager on the top of the structure will have a global view of the console. He linked to a parent entity will have a view of all the information of their level and the sub-entities levels. A manager linked to a sub-entity will only see the information of their level.
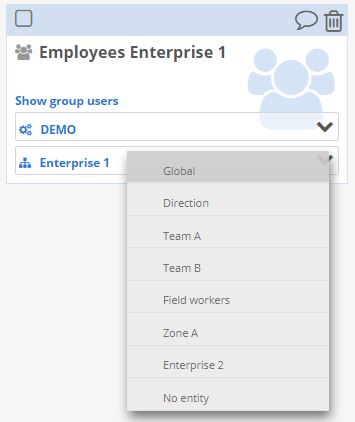
3. Assign groups of users (and their affiliated devices) to an entity
Affecting a group of users to an entity enables to filter the visualization of the console for each manager according to their level in the structure. To do so, you have to affect a group of users to an entity (the linked devices and policies, will automatically be affected).
- Go to the Users and Groups tab and on the Groups sub-tab. If before you need to assign users to group, follow this tutorial.
- In this tab, you see your groups of users and the policy they are affected to (if they are already created). It is here that you can link a group to an entity, by clicking on in front of No entity and by selecting the entity of your choice.
If we take the example of the above structure:
- Manager 1 (manager1@example.com), from the Global entity, will have an overview of the console.
- Manager 2 (manager2@example.com) will only see the group of users affected to the entity Enterprise 1. In the same way, he will only see the devices and policies linked to those users (including those linked to the entities “Direction”, “Team A”, “Team B”, “Field workers” or “Zone A”).
- Manager 3 (manager3@example.com), from the Team A entity, will only see the group of users assigned to the Team A entity. And he will only see the devices and the policies linked to those users. His view will be limited to the Team A.
As the main administrator, you also have the possibility to see how the different managers can see the administration console and which access they have. You just need to click on ![]() non the manager’s card.
non the manager’s card.
![]()
Once you have finished viewing the console as a specific manager, you can click on Exit to have a full access.
If a manager is linked to an entity, even if it is the default entity, they will only see the users that are part of a group linked to an entity. If some users aren’t linked to a group or if their group isn’t linked to an entity, they will be invisible to such a manager.