How to enable or disable the Factory Reset Protection on a device?
WARNING: For TinyMDM versions 3.04770 to 3.04790, disabling Google reset protection (FRP) is currently unavailable. To avoid device lock-up after a factory reset, please update TinyMDM or remove any Google account from the device before proceeding with the reset.
What does “FRP” means? Google Factory Reset Protection is a security method designed to prevent anyone but the device’s owner to factory reset it. When you activate FRP, it prevents someone who doesn’t know the account from using the device. Although it’s useful when lost or stolen, it can become a problem in many situations, especially when it comes to enterprises: if an employee (signed in with his Google account as device owner) leave the company, his device will become unusable after factory reset. With TinyMDM, it is possible to preconfigure a Google account for the FRP. If you turn it on after a factory reset, you can unlock the device using the Google account.
A. Enable the Google FRP
1. Activate the feature from the policy
From your TinyMDM account:
- Go on to the Policies tab and click on Edit to modify the policy of your choice
- Inside the policy, scroll down to the Device wide-controls sub tab and tick Enable Google factory reset protection (FRP).

2. Add the Google account
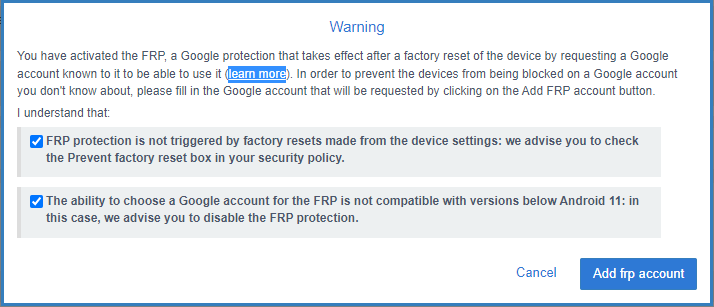
- Then click on Add FRP account. An informative pop-up window appear to explain the importance of adding a FRP account.
Important: If you check “Enable Google factory reset protection (FRP)”, but do not enter an account by clicking on Add FRP account, it activates it. Then, it will completely block the device after a factory reset (if someone enter an unkown Google account or if the FRP is activated on an Android 10 of older version). In this case, to remove the FRP protection, you will have to send the device back to the manufacturer with a proof of purchase, as it is not managed by the MDM solution.
- Check the information boxes and confirm by clicking on Add FRP account.

- Then, you are redirected to the Google connexion page, where you can choose an existing Google account or create a new one.
- Once you select the account, you you go back to the TinyMDM policy and the chosen account becomes visible under “Enable Google factory reset protection (FRP)”.
B. Disable the Google FRP
On TinyMDM, you can disable the protection option on your fully-managed or kiosk mode devices. Check this option on Android 10 or less devices, because it is not possible to preconfigure an account for the FRP.
- From your TinyMDM account, go on the Policies tab and click on Edit to modify the policy of your choice
- Under Device-wide controls tab, tick the Disable Google factory reset protection (FRP) box

- Once activated, the Google account verification step after a factory reset is skipped.
