How to manage Wi-Fi configurations?
Network security is one of the top IT concerns, and companies are working hard to ensure the Wi-Fi networks that mobile devices can access are identified and verified, for security reasons. In addition, the ability to connect automatically to a network and start working as soon as employees enter the premises is key to maintaining business productivity (especially when they have access to several locations and networks). And that’s exactly why with TinyMDM, you can choose to preconfigure favorite networks, disable Wi-Fi on some devices, forbid connections to unsecured networks, etc.
A. Preconfigure Wi-Fi networks 
You can choose to configure Wi-Fi networks not matter the management mode. This allows Wi-Fi networks to be automatically configured on the devices, without the end-users having to know or type the password.
- Go to the Wi-Fi Networks tab
- Click on either Configure a new Wi-Fi network or Configure a new EAP Wi-Fi network
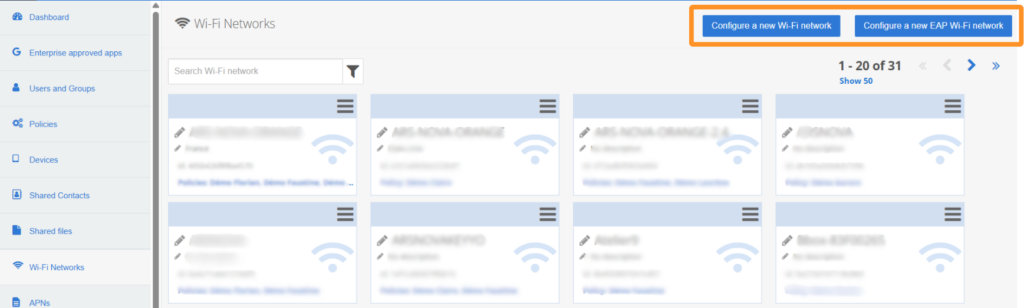
- Enter the information of the network: its name (ssid) & password. For EAP Wi-Fi, you will need more info, such as additional passwords or certificates
- All the Wi-Fi networks added will be listed in this tab. You will then be able to push them to the devices through the policies.
B. Push configured networks on devices
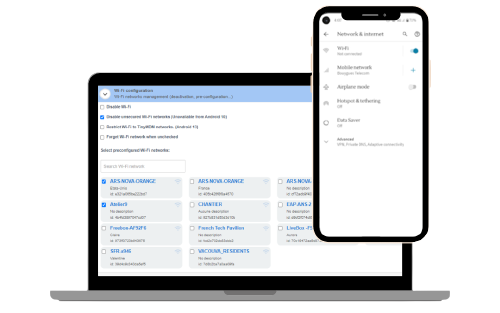
- Go on the Policies tab and edit the one you want to push your Wi-Fi networks in
- In the Wi-Fi configuration sub tab, you see multiple settings regarding the Wi-Fi as well as all the networks you have preconfigured.
- By ticking the box next to a network, you will push it on all the devices linked to the policy. It means that as soon as the devices will be near one of those selected networks, they will be connected to internet.
Important : When changing settings for a Wi-Fi network that is already in use by devices (password, SSID…), the devices must be temporarily connected to another Wi-Fi network or using mobile data. Without an alternative network, they will lose their connection and will not be able to receive the new settings, requiring a manual reconnection.
C. Restrict connections only to networks preconfigured on TinyMDM
1. Setting up the restriction
To ensure that devices only connect to approved and preconfigured Wi-Fi networks, TinyMDM allows to restrict connections to networks pushed via the admin console. This feature provides enhanced security by preventing connections to unverified networks. To do this, follow the steps below:
- Connect to TinyMDM admin console and go to the Policies tab
- Create a policy or modify an existing one
- In the Wi-Fi configuration sub tab, you see multiple settings regarding the Wi-Fi as well as all the networks you have preconfigured
- Tick the Restrict Wi-Fi to TinyMDM networks (Android 13) box
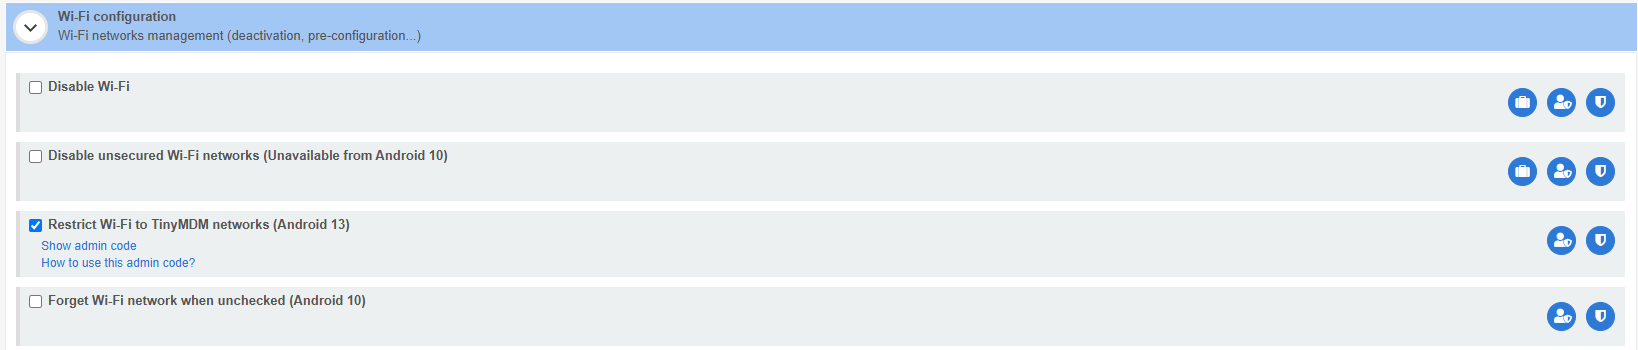
By activating this option, you ensure that the mobile devices can only connect to the Wi-Fi networks you have approved, preventing access to potentially insecure networks.
2. What to do if the Wi-Fi(s) are no longer accessible?
It is possible to temporarily remove the restriction to connect to Wi-Fi networks other than those specified in TinyMDM, in order to unblock a device that has lost its Internet connection. For example, if a device is configured in location A with Wi-Fi configured in TinyMDM, but its purpose is to be used in location B, with Wi-Fi not configured in TinyMDM, then the device will lose its connection when changing location. To solve this problem:
- From the TinyMDM administration console, the administrator configures the Wi-Fi network (that of location B) to be used by the device. To do this, he configures the Wi-Fi network from the Wi-Fi Networks tab, then adds it to the policy. Refer to parts A and B of this tutorial if necessary.
- Under Restrict Wi-Fi to TinyMDM networks (Android 13), visible in the Wi-Fi configuration sub-tab of the policy, the administrator needs to click on Show admin code, then send it to the device user.
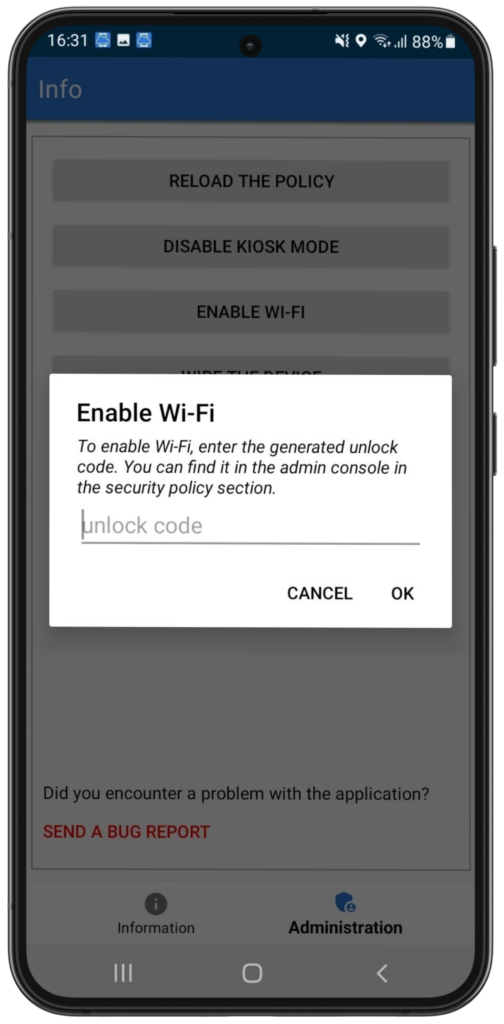
- On the other hand, the user needs to open the TinyMDM application (or Info if in kiosk mode), go to the Administration tab, click on Enable Wi-Fi button and enter the admin code.
- By entering this admin code, the user will be able to temporarily connect to a new Wi-Fi network (that of location B) from the Wi-Fi settings. Once connected to the Internet, the policy can be reloaded from the TinyMDM application (or Info if in kiosk mode), Administration tab, by clicking on the Reload the policy button.
- By reloading the policy, the device will be connected to the Wi-Fi network (that of location B), which is considered as a Wi-Fi network configured in TinyMDM.
D. Forget a Wi-Fi network
TinyMDM offers a feature that lets you forget a Wi-Fi network when it is unchecked in the policy. To do this, simply check the Forget Wi-Fi network when unchecked box.
Warning: If the Forget Wi-Fi network when unchecked box is activated and, for whatever reason, the device cannot connect to another network, the device will have to be reset. Make sure you always have an alternative network available to avoid a situation where the device becomes inaccessible.
E. Disable Wi-Fi access on devices
1. Disable unsecured Wi-Fi
By ticking the box Disable unsecured Wi-Fi networks, users will no longer be able to connect to unsecured networks, such as public Wi-Fi or those without passwords.
This prevents devices from connecting to networks that could compromise data security.
For your information, this feature is only compatible with devices running Android 9 or earlier.
2. Disable all Wi-Fi
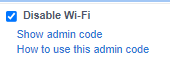
By ticking the box Disable Wi-Fi, the Wi-Fi connection is completely disabled on all devices associated with this policy.
Users will not be able to reactivate Wi-Fi manually from the device. To force Wi-Fi reactivation locally, the Admin code will be required (see part F below).
Warning: this setting prevents any Wi-Fi connection. It should therefore be used with caution, especially for devices without a 4G Internet connection.
F. Enable Wi-Fi from devices
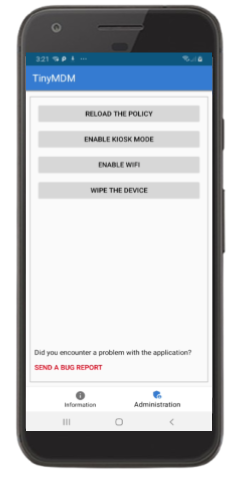
In fully managed mode, the user has to go on the TinyMDM application of their device. In kiosk mode, this app is called Info. Note: in kiosk mode, you have to approve the app Info beforehand to be able to activate the internet connection.
Then, the user needs to click on Administration tab, then on Enable Wi-Fi and type in the Admin code, visible on the console, under Disable Wi-Fi. Mobile devices will temporary have access to Wi-Fi networks.