How to create folders in kiosk mode and add applications to them?
Prerequisite: the device must be in kiosk mode. If you don’t know how to activate kiosk mode in your policy, follow this tutorial.
A. Create a folder and add applications
1. Go to the Policies tab and click on Modify to modify the policy of your choice.
2. Scroll down the policy to the Apps management section. Here you’ll see a list of all apps authorized for this policy. As a reminder, grayed-out applications are not approved in the policy (learn more).

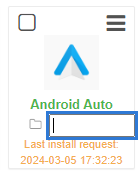
3. Under each of your authorized application icons, you’ll see “No folder”, which means that your application is currently not in any folder and appears directly on the kiosk mode home screen. To put it in a folder, click on “No folder”, enter the desired folder name and click on Enter. The folder will automatically appear on the home screen in kiosk mode, and the application will be accessible by opening the folder:
4. To add other applications to this folder, simply perform the same operation: click on “No folder” under the desired application or file shortcut, then enter the same folder name and click Enter.
B. Remove an application from a folder
1. Go to the Policies tab and click on Modify to modify the policy of your choice.
2. Scroll down the policy to the Apps management section.
3. Under the application icon, click on the folder name, then erase it and press Enter. Your application will then no longer be visible in the folder, but directly visible on the home screen in kiosk mode.
C. Delete a folder
1. Go to the Policies tab and click on Modify to modify the policy of your choice.
2. Scroll down to Apps Management, then carry out the steps in point B above for each application (or file shortcut) linked to the folder you wish to delete.
3. Once no more applications are linked to the folder, it will automatically delete itself.
