How to visualize and take control over your Android devices?
Please note:
- The remote viewing or remote control feature is available for mobile devices managed in Fully Managed or Kiosk mode. It is not available for devices in BYOD (Bring Your Own Device) or WPCO (Work Profile on Company Owned) modes.
- The remote viewing feature is available for all Android devices, regardless of brand and model. However, the remote control feature requires certain permissions specific to models and manufacturers, which is why it is only compatible with certain brands and models of devices.
A. Remote viewing session
1. Start a session
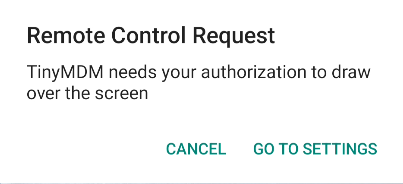
Please note: a “Remote Control” Request pop-up may appear on the device the first time the feature is activated. This pop-up requests access to the device settings to enable TinyMDM to be overlaid on other applications, an action that is essential for starting a remote session. All you have to do is click on Go to settings, then search for TinyMDM in the list of suggested applications and allow the application to be overlaid.
After you logged in to your TinyMDM account, go to the Devices tab, search for the device you want to visualize and click on ![]() on the device’s card:
on the device’s card:

2. A window appear on your browser: Connection to remote device in progress

2a. At the same time, a remote control request pop-up will appear on the device. The device user can either accept or decline it. If no action is taken, the request will be automatically granted within 10 seconds.
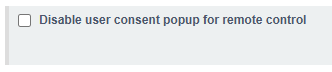
If you do not want to see this pop-up appear, you can go to the policy associated with the device, and under the Screen Control sub-tab, check the following feature:
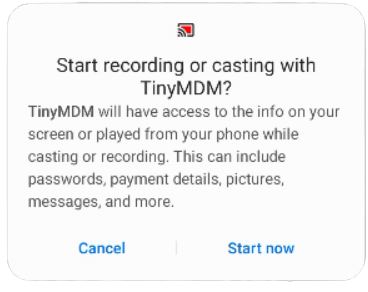
3. On some devices, a second pop-up Start recording or casting with TinyMDM? may appear. Unlike the previous one, this pop-up can not be hidden from the policy. The user has to click on Start now to activate the remote view or control session:
The remote viewing session includes a guidance option to show the user where to click. You will therefore see a pointer appear on the device screen during the session.
Starting with Android 15:
- the screen recording permission asks if the user wants to share an app or the entire screen with the administrator. The user must choose Entire screen for the remote session to connect:


- if you enter sensitive information during a remote viewing or control session, the device screen will turn black. This is because Android has strengthened its security rules and does not allow sensitive data to be viewed during a remote session. The session will return to normal once the screen containing the sensitive data is closed.
2. End a session
The remote session can be ended either from the administration console or from the device itself.
From the administration console, by clicking the ![]() button in the top-right corner of the session window.
button in the top-right corner of the session window.
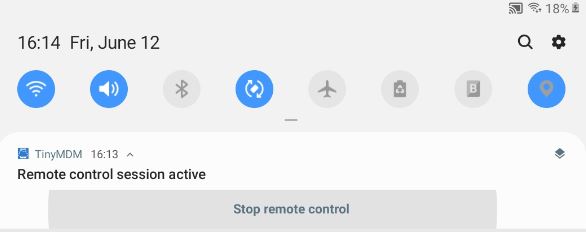
From the device, by going to the notification bar and clicking Stop remote control:
B. Enable remote control on compatible devices: 
1. Compatibles devices
This feature allows you to remotely control devices as if you were holding them in your hand. At the moment, remote control only works on devices from certain manufacturers. Most of the compatible models are listed below but this is not an exhaustive list:
- Athesi: AP5701, AP5702, AP5706
- Blackview: BL6000Pro, BV4900, BV4900Pro, BV5100, BV5200, BV5200Pro, BV5300, BV5300Pro, BV5500Plus, BV5900, BV6200, BV6200Pro, BV6300, BV6300Pro, BV6600, BV7100, BV7200, BV8900, BV8900Pro, BV9100, BV9200, BV9600Pro, BV9900E, N6000, Tab12, Tab13, Tab15Pro, Tab16, Tab5, Tab60, Tab70WiFi, Tab7WiFi, Tab8WiFi
- Crosscall: TAction X3, Action X5, CORE-M4, CORE-M4GO, Core-M5, Core-X3, Core-T4, Core-T5, Core-X4, Core-X5, Core-Z5, Stellar-X5, TREKKER-M1CORE, TREKKER-X3, Trekker-X4
- Datalogic: MEMOR 1, MEMOR 10, MEMOR 11, MEMOR 20, SKORPIO X5
- Doogee: N30, N40Pro, S35, S40, S40Pro, S41Pro, S51, S58Pro, S59, S59Pro, S61, S61Pro, S68Pro, S88Pro, S97Pro, S98, V10, V11, X95Pro
- Honeywell: CK65, CN80, CT40, CT60, EDA50, EDA50k, EDA51, EDA51k, EDA70, EDA71, EDA60k, EDA61k, RT10A, VM1A, VM3A
- Lenovo: LenovoTB-8505F, LenovoTB-8505FS, LenovoTB-8505X, LenovoTB-8505XC, LenovoTB-8505XS, LenovoTB-8705F, LenovoTB-J606F, LenovoTB-J606L, LenovoTB-J607Z, LenovoTB-J616F, LenovoTB-J616X, LenovoTB-J706F, LenovoTB-X306F, LenovoTB-X306X, LenovoTB-X505F, LenovoTB-X505L, LenovoTB-X605F, LenovoTB-X605FC, LenovoTB-X605L, LenovoTB-X605LC, LenovoTB-X606F, LenovoTB-X606FA, LenovoTB-X606X, LenovoTB-X6C6F, LenovoTB-X6C6X, LenovoTB-X705F, LenovoTB-X705L, LenovoTB125FU, LenovoTB128FU, LenovoTB128XU, LenovoYT-J706F, LenovoYT-X705F, TB132FU, TB300FU, TB300XU, TB301FU, TB310FU, TB328FU, TB328XU, TB330FU, TB330XU, TB350FU, TB350XU, TB370FU, TB372FC
- M3 Mobile: M3SL20, M3SM15X, M3SM20, M3UL20X
- Motorola: supported on all Android 13 or higher models
- Samsung: all models having a Knox licence (see details here).
- Ulefone: rmorX5, ArmorX5Pro, ArmorX6Pro, ArmorX7Pro, ArmorX8, ArmorX9, ArmorX9Pro, ArmorX10, ArmorX10Pro, ArmorX12, ArmorX12Pro, ArmorX13, Note14, PowerArmor14Pro, PowerArmor16Pro, PowerArmorX11, PowerArmorX11Pro
- Unitech: EA500, EA500Plus, EA502, EA510, EA602, EA630, PA760
- Urovo: DT50, DT50Q, DT50S, DT50X, P8100, P8100P, RT40, SQ45S
- Wiko: W-K130-EEA, W-K211-EEA, W-K610-EEA, W-K610-FRA, W-K630-EEA, W-P311-EEA, W-V720-EEA, W-V745-EEA, W-V830-EEA
- Zebra: supported on all models except for TC20 and TC25. Refer to this tutorial for more details.
Starting with Android 15:
- Due to changes implemented by Google services, remote control is currently unavailable for devices from manufacturers Athesi, Blackview, Datalogic, Doogee, Honeywell, Lenovo, M3 Mobile, Ulefone, Unitech and Wiko. Remote viewing remains available. Our teams are currently in contact with these manufacturers to enable remote control on their Android 15 models.
- Devices from the following manufacturers are not affected:
- Samsung
- Zebra
- Crosscall
- Motorola
- Urovo
2. Automatically install the remote control plugin
For all brands listed above, except Samsung and Zebra, it is necessary to install a TinyMDM plugin on the devices to be able to take control of them remotely. To avoid searching for the right plugin and having to install it manually, prefer the automatic installation. To do this:
- Go to Policies tab and click on Edit to modify the policy
- Scroll down the policy to the ‘Device-wide controls’ sub tab
- Check the ‘Automatically install the remote control plugin when available’ feature

Note: In the case of Zebra devices, this will automatically download, install and configure the Zebra OEMConfig application. If it is already installed on your policies, your configurations will not be modified, only the parameters required for remote screen control will be added. Find out more.
C. Error messages you might see
From the device
- Could not reach remote peer, stopping remote control > Maximum connection time elapsed
- Error: the remote control disconnected without administrator intervention > Failure after login (crash / administrator-side network problem)
- The screen capture permission is missing, the remote control cannot start > TinyMDM lacks screen capture permission
- Remote control connection failed (error code) > Error. Please contact support team with error code.
From the dashboard
- Connection with remote device lost > Failure after login (crash / application-side network problem)
- Unable to reach the remote device > No response from remote device (user denial, device turned off or not connected to the network)
- Unable to start remote control session. TinyMDM server error (error number) > Server problem, contact support specifying the error number.
- Your internet browser is not compatible with the remote control feature. Please update to a newer version > Browser too old or not supported (not detected for the moment).